STAY INSPIRED! GET THE LATEST TIPS, TRENDS, AND EXCLUSIVES DELIVERED STRAIGHT TO YOU.
Chapter 4: DIY Duron Ranch Projects
Shopping and Building on a budget
Howdy Y’all!🤠Welcome back! I’m saving all the money I can. Remember those 16 rows of bricks? Back when Jose’s Team was pouring the cement, I thought it wise to save all the waste I could. I knew that inclining to the roll up door was going to be a task. I dug out those bricks that were not covered with my gathered, waste cement. I laid out a border of bricks. I raised up as many bricks as I could to meet the level of the slab and gradually moved down to the level of the existing driveway. This would enable a smooth drive up to the shop. I gathered more waste cement while it was still wet. The young man scraping out the ¾” drop and 6” apron on the slab was tossing the waste into a bucket. I would change out his bucket and pour the waste into the center of the bricks for more filler. It was not going to be the prettiest short driveway, but it was going to save me more time and MONEY. 🤠
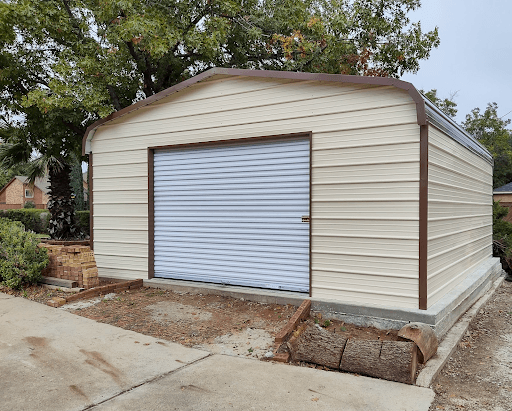
This is a picture of the area I’m talking about. I’ll raise the border of bricks and utilize most of the center bricks to give me the level necessary to drive up into the shop. I’m gonna try my luck at a “Dry Pour”. Below is the picture of my finished drive up.🤣 Like I said, it's not pretty, but it saved me a lot of time, money and it works.
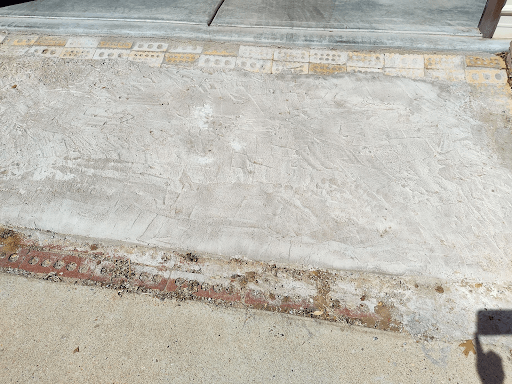
Just to let y'all know. “Dry Pour” is not the best way to go. The cement is not as strong as using a wet cement mix. It’s not going to be pretty, but it is saving me time and MONEY. Our EXPEDITION drives up perfectly and parks on the left side of the Shop.

Unfortunately, FORD is not one of our Sponsors, Affiliate or Brand Collabs…oooo😏I just learned a new phrase. “Brand Collabs”. “Sometimes, you just gotta wonder!” LOL! All kidding aside, I do hope they pick me up, because we are definitely a Ford Family. I really love my Ford F-150, my Expedition, my middle son's Escape and my youngest son's Ford Fusion. Funny though, my oldest son is still a Chevy guy. I know he remembers me being a Chevy guy too, back in the day. “Oh, Oh somebody reel me back in. I’m going way off topic again!” 😅 LOL!
Before completing the “Dry Pour”, I made a list of all the items I would need for the continued project, in and outside the Shop. I’m planning on an Office on the right back corner of the Shop. I have to be ready for the next big project, which is Electricity. I drew out a plan below. Things just pop into my head and I start writing and sketching. 🤣🤠
Studying my list, I’m thinking…”Yes…a dangerous pastime…I know.”
Home Depot advertises “up to 24 Months Financing, NO Interest”. I like that!
Here is my list.
4 bags of Quickrete 80 lb. bags, (trying my luck at a Dry Pour)
2 gallons of Concrete Sealer,
8 tubes of Loctite Premium Construction Adhesive for sealing the bottom edges all around the Shop, inside and outside.
4 tubes of Liquid Nails (I’ll explain later),
22 - 8 foot 2x4’s, (I’ll call these “studs”, even though studs are not 8 foot long) I wanted 8’ 🤠
10 sheets of Dry Wall,
1 sheet of Plywood ( to save more money, I’m utilizing extra frame work lumber that I have had stacked in my shed and garage),
1 - 24” right handed Door (to be installed later)
2 light switches, 2 light sockets,
1 - 220 socket ( for a Dryer, I’ll explain later) and
16 outlets (2 for each wall box. Each wall box you see in my draft will consist of 4 receptacles)
“ONE BIG PURCHASE” at “Home Depot” to take advantage of the FREE Financing.
Just to be fair, I want y’all to know. Lowes also offers the same or similar deal. 🤔 I have never tried their free financing program, but I’m just making sure to give y’all a choice.
My Draft below shows my Office project. I want y’all to take note of the “slash/?” beside the doorway of the Office. That will change over to the other side. The switch by the side door, left of the breaker box, will stay as is.
Also, I think it was so funny when my oldest son tried to explain to me the difference between volts, amps and watts. 😮 STOP! My head was about to explode. He is such a bright young man, so smart.🤗 I just couldn’t stick that much knowledge in my head. “Is it Miller Time yet?”
I drew my draft below thinking like a 70’s kid working on my parents house, barn and other small projects throughout the years. 110 was the normal outlets and 220 was for electrical stoves, ovens and clothes dryers.
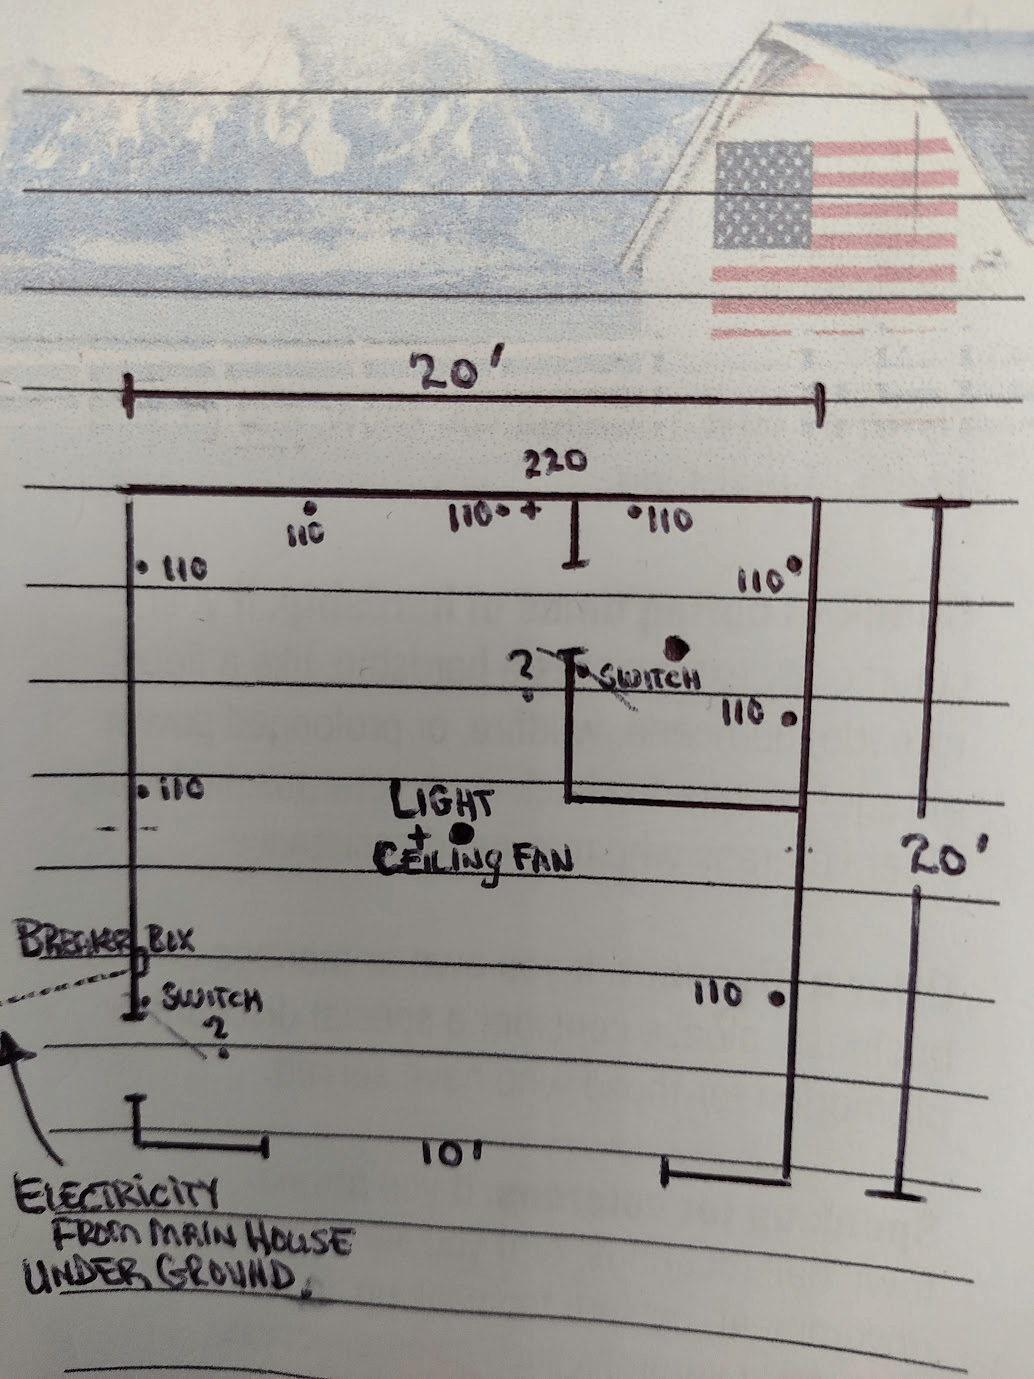
* What y’all think of my draft? 🤠
* Join me next time for more updates of my Projects at The DURON RANCH. Don’t forget to click on my Links to save time and MONEY, 🤠 tap the Like button👍, send feedback, ask questions and definitely Subscribe to The DURON RANCH. 🤠 Until next time, stay safe, make good choices and we'll see y’all soon! duronranch.com


WHAT TO READ NEXT
STAY INSPIRED!
GET THE LATEST LIFESTYLE TIPS, TRENDS, AND EXCLUSIVE CONTENT DELIVERED STRAIGHT TO YOU.


COPYRIGHT © 2025 DURON RANCH. ALL RIGHTS RESERVED.