STAY INSPIRED! GET THE LATEST TIPS, TRENDS, AND EXCLUSIVES DELIVERED STRAIGHT TO YOU.
Chapter 5: DIY Duron Ranch Projects
Shopping and Building on a budget
Howdy Y’all! 🤠 Welcome back! Today I want to share my story about building an office inside the back, right corner of the shop. I do have a lot to finish before I choose and schedule the Electrician. The first thing I have to do is SEAL the concrete floor of the shop. Corner to corner, I used the two gallons of the Sealer I purchased at Home Depot.
This Sealer was priced to my liking. It pours out a white, milky color, but don’t worry, it dries clear. I used a broom to spread the Sealer. I started from the rear of the Shop and made my way out the 10 Foot roll up door. “Voila!” LOL! While I let it dry, I’m going to wash out my Broom. A little soap and water will do the trick. It is recommended to apply two coats. I laid it on pretty thick, so I’m going with one application. Allow the sealer to dry for at least two hours. I’m gonna draft out the West wall, with the door frame, to show y’all my plan because I have to get the Office Frame built. I marked six anchor holes for the bottom plate of the 7’ x 8’ Frame. Three anchors for each wall.
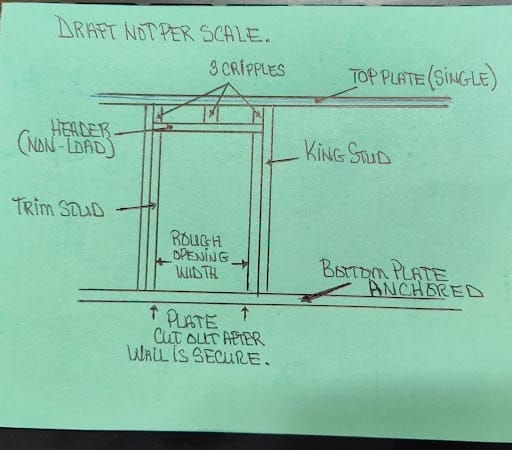
This draft is not per scale.
If you remember from Chapter 4, the big Home Depot purchase…. I decided on a 24” door. The rough opening will be 26 ½” wide and 82 ½” high. Anchors should be no more than six feet apart and placed 12” from the ends of each plate section. No worries on this small build.
I placed a concrete drill bit from Home Depot on my drill and went to drilling. My son bought me this Black+Decker drill some time back. It has cool attachments. He also gave me an electric corded drill in case the battery goes out with too much drilling. He purchased both of these older models a while back at Lowes.
Remember, On this project, just about everything was purchased at Home Depot, because I wanted to take advantage of the NO Interest for 24 months on a large purchase. I love using someone else’s money for FREE. LOL! Just make sure to pay off the full amount within the deadline or you will be paying a high interest charge. Make sure to read the fine print.
Remember the “Liquid Nails” purchase and the extra boards I had saved? I split five 2”x6” with my older model Skil saw. This Circular Saw I purchased at “Lowes” quite sometime ago. Splitting these boards gave me ten 2”x3” . I could use a level or just mark the placements by measuring from the existing metal bars of the shop. I went with the common 16 inch on center for placing the studs for this build. I used this Liquid Nails to attach the 2”x3” against the metal wall in that corner. Then I used 2” wood screws to attach the 2”x4” “Top Plate”. I had to notch out only two areas for the metal bars. Those two walls were now done. Next came the two outer walls with anchors and one door frame. “Measure TWICE, cut once.” I drilled holes on the bottom plates to match the anchors.
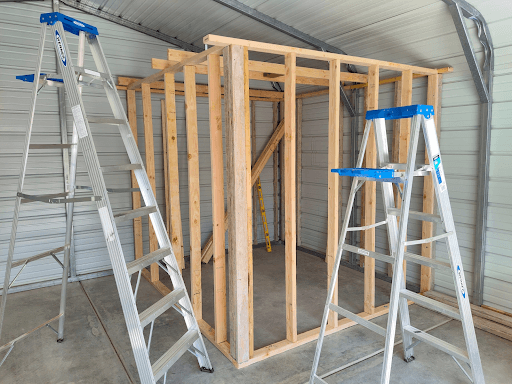
I utilized these 2 inch wood screws on all the frame work. I attached studs to the bottom plates and the top plates first. Again, 16 inch on center. The first wall with no door or windows went up and anchored. For this small of a build, I will not place a “Double Top Plate”. On the next wall, with a doorway, I will put together the Studs and the King Studs for the doorway. All attached on the concrete floor, then raised and placed onto the anchors. I will now go and tighten all the nuts of the anchors. Looking GOOD! I feel like the Amish.🤠 LOL! Next, I attached the Trimmer, the Header and the Top cripples for the doorway.
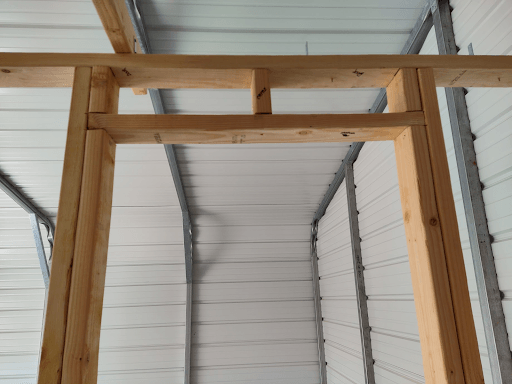
Using my two ladders shown in the picture below, I placed two joists in the middle, which holds the center light fixture and the two outer joists on the outside. I purchased these two ladders a while back at Lowes.
I am not completing all the joists because I plan on purchasing a “Kraken Foam Insulation”. Kraken, I’ll purchase from AMAZON. That story will be coming up. Not completing all the other joists, will give me maneuvering room to reach the ceiling of the shop with the foam insulation and work my way down.
Finding the Right Electrician: Maria and I have known Corey with Corey Sly Electrical Inc. for some time now. I gave his company a call and scheduled a time for an estimate. Derrick and Corbin came out and I have a lot of QUESTIONS.
I’m also thinking again, “a dangerous pastime…I know”. Well, I keep thinking of how I can save time and money. 🤠
ASK. You can save a lot of MONEY, if you just ASK.

The Guy’s answered all my questions and were willing to work with me on my requests. (my questions and requests, I will cover with y’all NEXT time.) Derrick gave me a fair estimate and I scheduled the job.
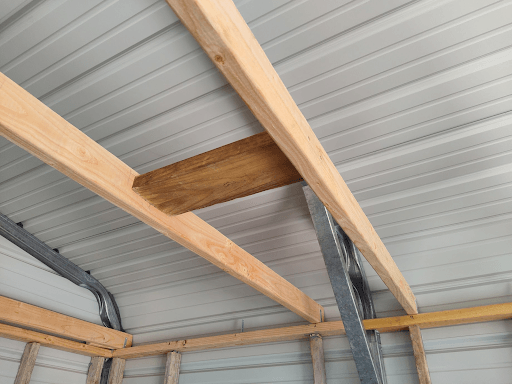
Above is a picture of the 2”x6” in between the two center Joist for ceiling light and maybe a ceiling fan later. Y’all can also see the 2”x3”s, snug fitted and liquid nailed to the metal walls. Once secure, I drilled a 2” screw through the top plate down into each 2”x3”.
Liquid Nails work great!!!
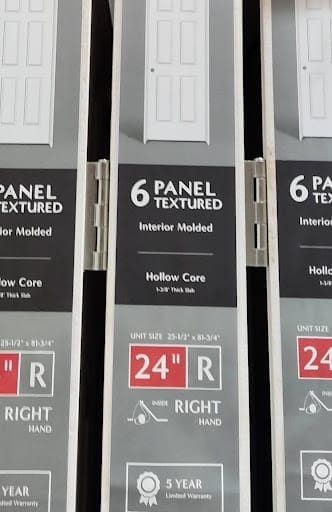
In my draft, I wrote 26 ½” wide, 82 ½” height for a rough opening. This purchase at Home Depot shows * Unit Size 25 ½” x 81 ¾”. That is the actual size of the door plus the door frame in the box. This allows room to level the door and utilize spacers as needed. My little green draft/sketch above shows where I will cut out that part of the bottom plate before installing the door. I will get down on my knees, wearing my knee padded work pants. Again, probably my best purchase ever, at any Walmart.
🤠 I will cut that piece out using my handy, dandy Sawzall.
The Office Frame work is 98% done. Enough to allow Corey Sly Electricians the room they need. I will let Derrick know about the light switch changing to the other side of the doorway.
Well, I've done enough damage for one day.
Join me next time for the rest of my Electrical Mission at the Duron Ranch. Don’t forget to Click on my Links to save time and MONEY. Tap the Like Button👍, send Feedback, ask questions and definitely Subscribe to the DURON RANCH! 🤠 Until next time, stay safe, make good choices and we'll see y’all soon! 🤠


WHAT TO READ NEXT
STAY INSPIRED!
GET THE LATEST LIFESTYLE TIPS, TRENDS, AND EXCLUSIVE CONTENT DELIVERED STRAIGHT TO YOU.


COPYRIGHT © 2025 DURON RANCH. ALL RIGHTS RESERVED.